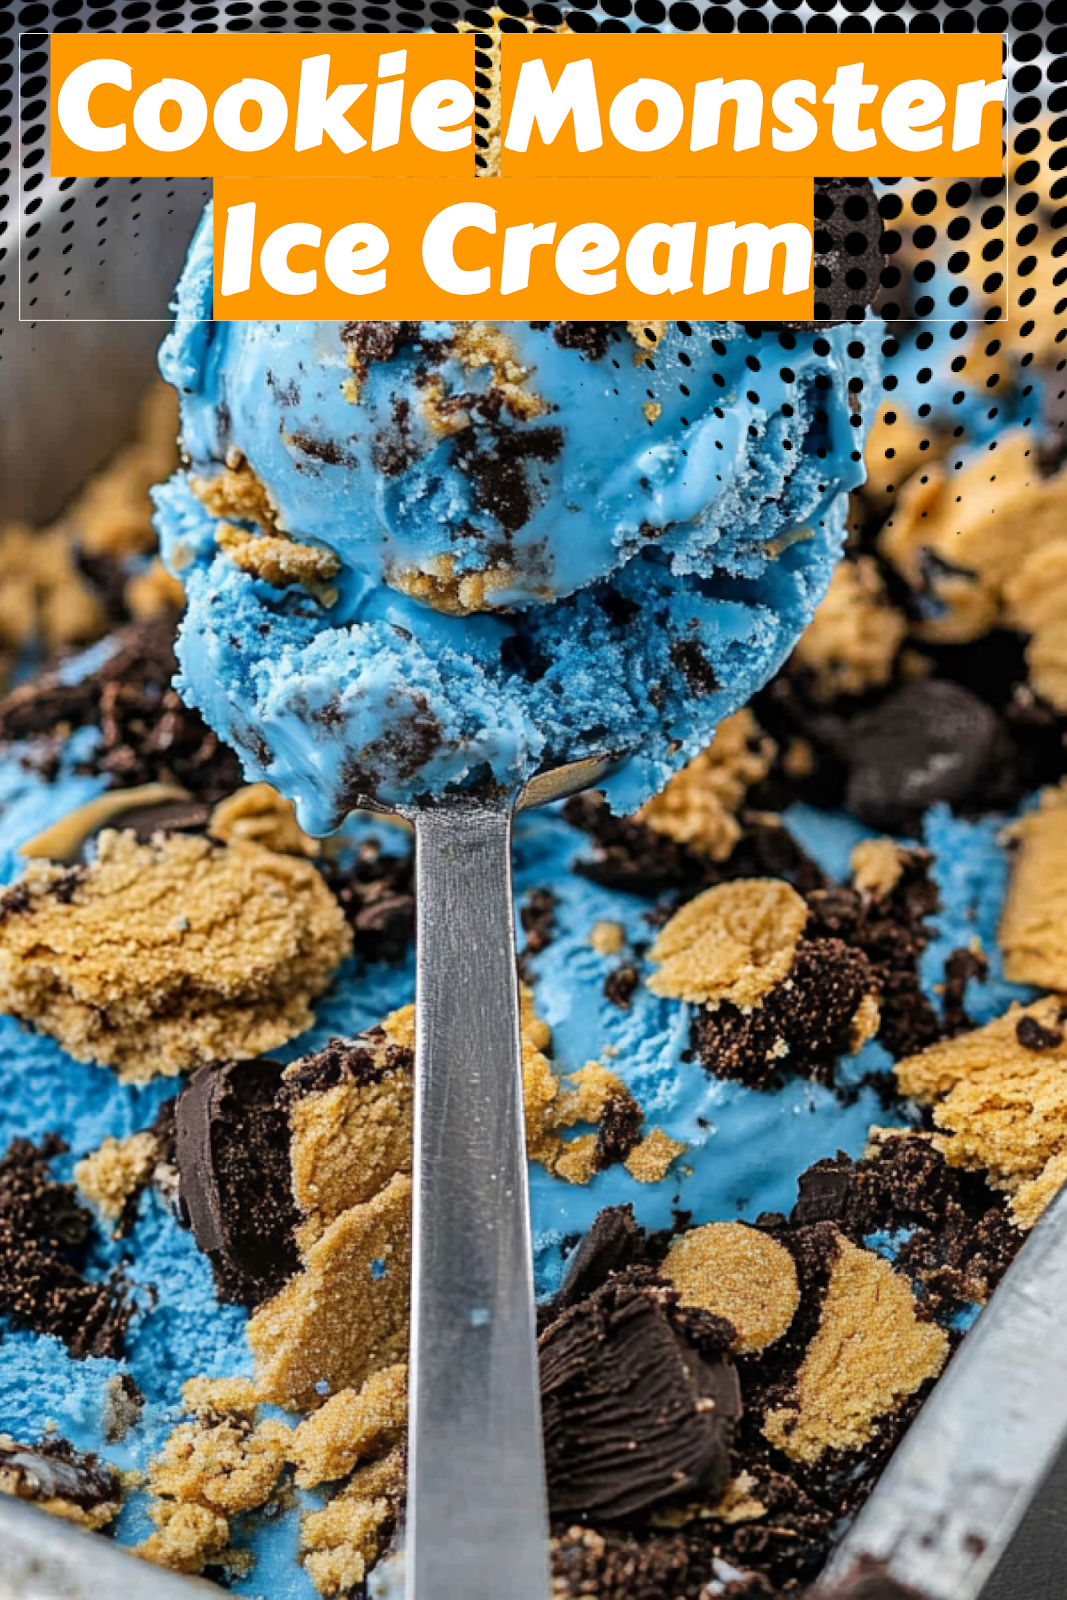
There’s something undeniably magical about watching children’s eyes light up when they spot the vibrant blue swirls of Cookie Monster Ice Cream at a party. After hosting my niece’s birthday celebration last weekend, I decided it was time to perfect a homemade version of this beloved treat that both kids and adults go crazy for.
This Cookie Monster Ice Cream recipe transforms simple ingredients into a dessert that’s not just visually stunning but incredibly delicious. The cool, creamy blue base dotted with chunks of chocolate sandwich cookies and chocolate chip cookies captures the essence of everyone’s favorite furry blue monster. Best of all, this no-churn recipe requires minimal effort but delivers maximum flavor and fun!
Whether you’re planning a special celebration or simply want to bring a smile to someone’s face, this Cookie Monster Ice Cream is guaranteed to be a hit. The combination of vanilla-infused cream, sweet condensed milk, and generous cookie pieces creates a texture and taste that rivals any store-bought version.
Why You’ll Love This Cookie Monster Ice Cream
✅ No ice cream maker required – perfect for beginners!
✅ Only requires 6 simple ingredients
✅ Customizable with your favorite cookie combinations
✅ Makes a show-stopping dessert for birthday parties
✅ Kid-approved and adult-friendly
✅ Freezes beautifully for make-ahead convenience
✅ Way more affordable than store-bought specialty ice cream
✅ Creates magical blue color without artificial dyes (if using natural food coloring)
Ingredients for Cookie Monster Ice Cream
- 2 cups heavy whipping cream
- 1 teaspoon pure vanilla extract
- 1-2 drops blue gel food coloring (adjust for desired intensity)
- 1 (14 oz) can sweetened condensed milk
- 10 Oreo cookies, roughly chopped
- 10 Chips Ahoy cookies, roughly chopped
Optional toppings:
- Additional crushed cookies
- Chocolate syrup
- Cookie dough pieces
- Sprinkles
How to Make Cookie Monster Ice Cream – Step by Step
Step 1: Prepare Your Tools and Ingredients
Before starting, make sure you have a large glass mixing bowl, an electric mixer (or hand whisk if you’re up for a workout), a rubber spatula, and a loaf pan or freezer-safe container. Chill your mixing bowl in the freezer for 10-15 minutes before whipping the cream for best results.
Step 2: Whip the Cream
In your chilled large glass mixing bowl, combine the heavy whipping cream and vanilla extract. Using an electric mixer, whip on medium-high speed until stiff peaks form – this usually takes about 3-4 minutes. You’ll know it’s ready when the cream holds its shape when the beaters are lifted.
Step 3: Add the Vibrant Blue Color
Gently fold in the blue gel food coloring using a rubber spatula. Start with just a drop or two, then add more if needed until you reach that perfect Cookie Monster Ice Cream blue hue. Remember that the color will deepen slightly as it freezes, so aim for a slightly lighter shade than your target.
Step 4: Incorporate the Sweetened Condensed Milk
Pour the sweetened condensed milk into the whipped cream mixture. Using your spatula with a gentle folding motion (not stirring), combine until well mixed. Fold from the bottom up and over to maintain the air in your whipped cream base, which creates that perfect creamy texture.
Step 5: Add the Cookie Mix-ins
This is where the magic happens! Fold in the roughly chopped Oreos and Chips Ahoy cookies. Don’t over-mix – you want visible chunks of cookies throughout your Cookie Monster Ice Cream for authentic monster appeal. Reserve a small handful for topping if desired.
Step 6: Transfer and Freeze
Pour the mixture into a loaf pan or freezer-safe container. If reserved, sprinkle the remaining cookie pieces on top. Cover with plastic wrap, pressing it gently against the surface of the ice cream to prevent ice crystals from forming.
Step 7: Patience is Key
Place your Cookie Monster Ice Cream in the freezer for at least 6 hours, though overnight is ideal for the perfect scoopable consistency. The hardest part is waiting!
Step 8: Serve and Enjoy
When ready to serve, let the ice cream sit at room temperature for about 5 minutes to soften slightly for easier scooping. Serve in bowls, cones, or as part of a larger dessert creation.
Pro Tips for Making the Best Cookie Monster Ice Cream
- Use cold equipment: Chilling your bowl and beaters before whipping the cream helps achieve the perfect texture.
- Don’t skimp on the cookies: The generous cookie chunks are what make this Cookie Monster Ice Cream authentic – Cookie Monster wouldn’t have it any other way!
- Gel vs. liquid food coloring: Gel food coloring is recommended as it provides vibrant color without watering down your mixture.
- Natural blue options: For a natural alternative, try blue spirulina powder instead of artificial food coloring.
- Cookie variations: While traditional Cookie Monster Ice Cream uses Oreos and chocolate chip cookies, feel free to experiment with other cookie varieties.
- Make it ahead: This ice cream actually improves with a day or two in the freezer as the flavors meld together beautifully.
- Perfect scoopability: Dip your ice cream scoop in warm water between servings for picture-perfect scoops every time.
Best Ways to Serve Cookie Monster Ice Cream
This vibrant blue dessert isn’t just delicious – it’s also incredibly versatile. Here are some creative ways to serve your homemade Cookie Monster Ice Cream:
- Classic ice cream cones topped with extra cookie crumbles
- Between two chocolate chip cookies for epic ice cream sandwiches
- As the centerpiece of a birthday dessert table
- In milkshake form with a splash of milk blended in
- Topped with hot fudge for a decadent sundae
- Alongside a warm brownie for the ultimate contrast
- In mini cups with a cookie garnish for parties
- As a filling for cookie monster themed cakes
For a complete dessert experience, pair with our Chocolate Chip Cookie Bars or Hot Fudge Sauce for an indulgent treat that will have everyone asking for seconds!
Cookie Monster Ice Cream Flavor Variations
While the classic recipe is always a hit, here are some creative variations to try:
- Chocolate Monster: Add 2 tablespoons of cocoa powder to the base for a chocolate version
- Cookie Dough Monster: Fold in chunks of edible cookie dough along with the cookies
- Peanut Butter Monster: Swirl in 1/4 cup of melted peanut butter before freezing
- Vegan Cookie Monster: Use coconut cream instead of heavy cream and dairy-free cookies
- Birthday Cake Monster: Add colorful sprinkles and pieces of vanilla cake
Nutritional Information for Cookie Monster Ice Cream
Per serving (approximately 1/2 cup):
- Calories: 385 kcal
- Fat: 23g
- Saturated Fat: 14g
- Carbohydrates: 40g
- Sugar: 32g
- Protein: 5g
- Sodium: 165mg
Note: This Cookie Monster Ice Cream is definitely a special treat! For a lighter version, consider using light whipping cream and reducing the cookie pieces.
Storage & Leftovers
Your homemade Cookie Monster Ice Cream will keep beautifully in the freezer if stored properly. Here’s how to maintain that fresh-made taste and texture:
- Store in an airtight container to prevent freezer burn
- Place a piece of parchment paper directly on the surface before adding the lid
- Keep for up to 2 weeks in a standard freezer
- For longer storage (up to 1 month), wrap the entire container in aluminum foil
- Always allow to soften for 5-10 minutes before serving for the best texture
If your ice cream develops ice crystals over time, simply let it soften slightly, then mix vigorously before refreezing for improved texture.
Frequently Asked Questions About Cookie Monster Ice Cream
What ingredients are in Cookie Monster Ice Cream?
Traditional Cookie Monster Ice Cream contains a vanilla or sweet cream base colored vibrant blue, with chocolate sandwich cookies (like Oreos) and chocolate chip cookies mixed throughout. Our homemade version uses heavy whipping cream, sweetened condensed milk, vanilla extract, blue food coloring, and plenty of cookie pieces.
How do you make Cookie Monster Ice Cream?
Making homemade Cookie Monster Ice Cream is surprisingly simple! You whip heavy cream with vanilla, fold in sweetened condensed milk and blue food coloring, add chopped cookies, and freeze for at least 6 hours. No ice cream maker is needed for this no-churn method.
Where can I buy Cookie Monster Ice Cream?
Many specialty ice cream shops and national brands offer versions of Cookie Monster Ice Cream. Baskin-Robbins has featured it as a seasonal flavor, and brands like Blue Bell and Turkey Hill have offered similar versions. However, making it at home allows you to customize it exactly to your preferences!
What flavor is Cookie Monster Ice Cream?
Despite its vibrant blue color, Cookie Monster Ice Cream is typically vanilla or sweet cream flavored. The distinctive taste comes from the generous mix-ins of chocolate sandwich cookies and chocolate chip cookies throughout the base. The blue color is purely aesthetic, meant to resemble the beloved Sesame Street character.
Cookie Monster Ice Cream for Birthday Parties
This playful dessert is perfect for children’s birthday celebrations! Here’s how to create a memorable Cookie Monster Ice Cream party experience:
- Serve in colorful bowls with googly eye toppers
- Create a DIY ice cream sundae bar with various toppings
- Make mini Cookie Monster Ice Cream sandwiches as party favors
- Use it as the filling for an ice cream cake
- Pair with blue cotton candy for a fun color theme
- Decorate the serving table with Sesame Street themed items
- Offer cookie-decorating as a complementary activity
The vibrant blue color and fun cookie mix-ins make this Cookie Monster Ice Cream an instant hit with children of all ages. Plus, parents will appreciate that it can be made days in advance!
Conclusion
There’s something wonderfully nostalgic and joyful about Cookie Monster Ice Cream, and this homemade version captures all that magic with simple ingredients and easy techniques. The beautiful blue color and generous cookie pieces make it a visual delight, while the creamy texture and sweet flavor satisfy even the most demanding sweet tooth.
Whether you’re hosting a children’s birthday party, looking for a fun weekend project, or simply want to indulge your inner child, this Cookie Monster Ice Cream recipe delivers smiles all around. And since it requires no special equipment, it’s accessible to cooks of all skill levels.
I’d love to hear how your Cookie Monster Ice Cream turns out! Leave a comment below with your experience, variations, or serving suggestions. And don’t forget to share your creations on social media – tag us for a chance to be featured!
Now go make some Cookie Monster Ice Cream and embrace your inner cookie monster – just remember what the blue guy himself would say: “Om nom nom nom!”
Print
Cookie Monster Ice Cream: The Ultimate Homemade Trea
- Total Time: 6 hours 15 minutes
- Yield: 8 servings 1x
- Diet: Vegetarian
Description
A vibrant and rich no-churn Cookie Monster ice cream made with whipped cream, sweetened condensed milk, and chunks of Oreo and Chips Ahoy cookies. A fun, colorful dessert perfect for all ages and occasions.
Ingredients
- 2 cups heavy whipping cream
- 1 teaspoon pure vanilla extract
- 1 (14 oz) can sweetened condensed milk
- 1–2 teaspoons blue gel food coloring (to preference)
- 12 Oreo cookies, roughly chopped
- 8 Chips Ahoy cookies, roughly chopped
- 1/4 cup mini chocolate chips (optional)
Instructions
- Line a loaf pan or freezer-safe container with parchment paper.
- In a large bowl, whip the heavy cream and vanilla extract until stiff peaks form.
- Fold in the blue food coloring until evenly distributed.
- Add the sweetened condensed milk and gently fold until smooth and combined.
- Fold in the chopped Oreo and Chips Ahoy cookies, and mini chocolate chips if using.
- Transfer the mixture to the prepared container and smooth the top.
- Cover with plastic wrap and freeze for at least 6 hours or overnight until firm.
Notes
- Use blue spirulina powder as a natural food coloring alternative.
- Let sit at room temperature for 5–10 minutes before scooping for a perfect texture.
- Store in an airtight container in the freezer for up to 2 weeks.
- Prep Time: 15 minutes
- Cook Time: 0 minutes
- Category: Dessert
- Method: No Churn
- Cuisine: American
Nutrition
- Serving Size: 1/2 cup
- Calories: 385
- Sugar: 30g
- Sodium: 175mg
- Fat: 23g
- Saturated Fat: 13g
- Unsaturated Fat: 9g
- Trans Fat: 0g
- Carbohydrates: 37g
- Fiber: 1g
- Protein: 5g
- Cholesterol: 65mg
