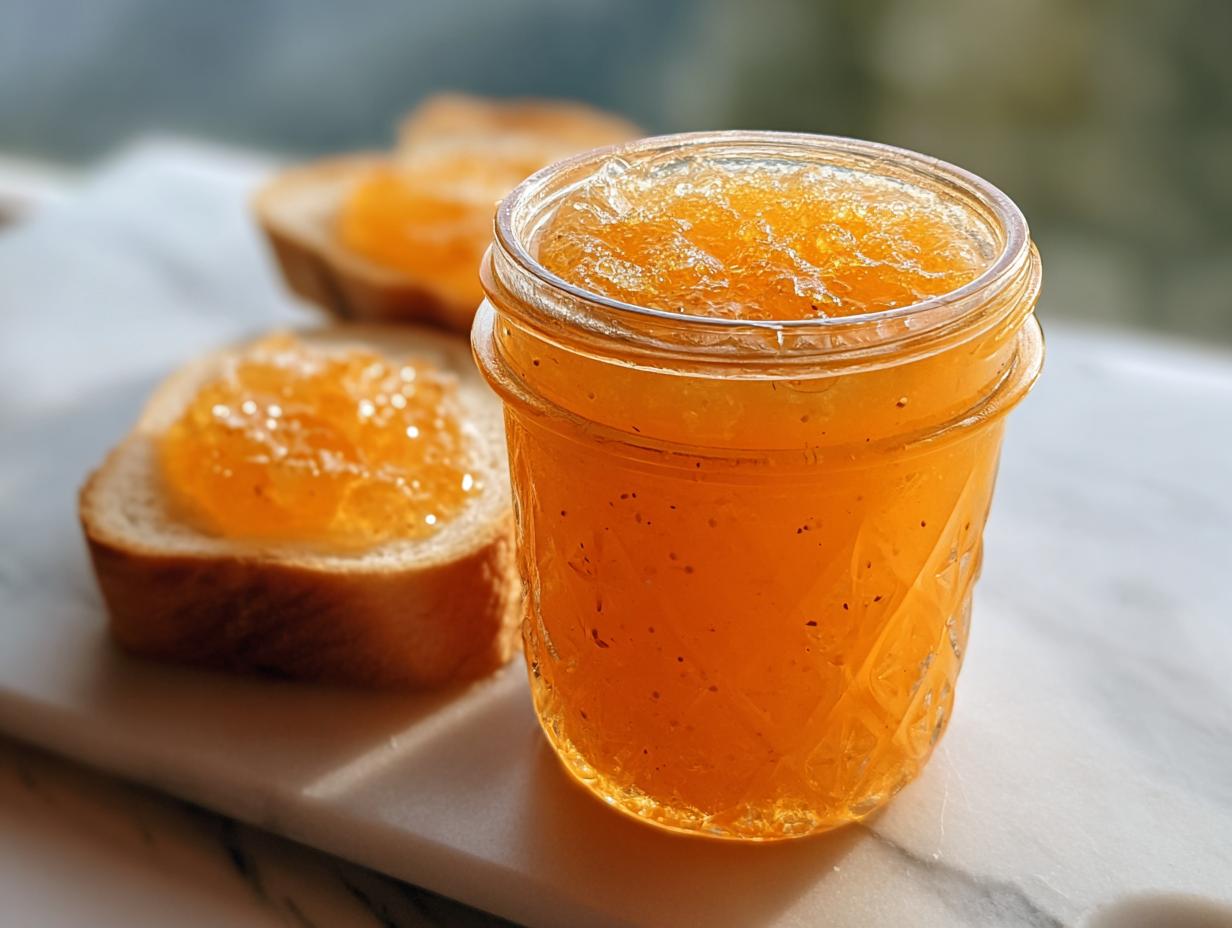
Dreamsicle Jelly has always been my go-to for a taste of pure nostalgia. I remember summers spent chasing down the ice cream truck, the pure delight of that creamy orange and vanilla swirl melting in my hand. This old fashioned dreamsicle jelly recipe brings back all those wonderful memories, capturing that exact sweet, tangy, creamy flavor in a jar. It’s so easy to make, and the vibrant color is just gorgeous. If you’ve ever searched for an amazing orange cream jelly recipe, your search ends here! Let’s get cooking!
Why You’ll Love This Dreamsicle Jelly
This homemade Dreamsicle Jelly is a guaranteed crowd-pleaser for so many reasons:
- Incredible Taste: It perfectly captures that iconic creamy orange and vanilla flavor you remember.
- Quick Prep: While canning takes time, the active prep for this Dreamsicle Jelly recipe is surprisingly fast.
- Budget-Friendly: Using fresh oranges and pantry staples makes this an affordable treat.
- Family Favorite: Kids and adults alike adore this sweet, nostalgic spread.
- Versatile: It’s not just toast; think of it as a delightful orange cream jelly recipe for biscuits, scones, or even yogurt.
- Nostalgic Charm: It’s more than just a jelly; it’s a jar of happy memories!
- Easy Orange Cream Jelly Recipe: You’ll find this orange cream jelly recipe straightforward and rewarding.
- Beautiful Presentation: The lovely color and smooth texture make it a fantastic homemade gift.
Ingredients for Dreamsicle Jelly
Gathering the ingredients for this Dreamsicle Jelly is half the fun because it smells so good even before you start cooking! This orange vanilla jelly recipe relies on simple, fresh components to get that authentic flavor.
- 4 cups freshly squeezed orange juice – make sure it’s from ripe oranges for the best flavor; this is the base of our dreamsicle flavor jelly.
- 4 cups granulated sugar – this balances the tartness of the oranges and helps the jelly set.
- 2 vanilla beans, split and scraped – the seeds from these add the creamy vanilla notes that make it taste like a dreamsicle; you could also use 2 teaspoons of vanilla extract if you don’t have beans.
- 1 pat of butter – this small addition helps reduce foaming during the boiling process.
- 1 box pectin (optional) – pectin helps ensure a firm set, especially if your oranges aren’t super juicy or you’re making this without pectin for the first time.
How to Make Dreamsicle Jelly
Making this dreamy spread is a delightful process that fills your kitchen with incredible aromas. Follow these steps for a perfect batch of homemade Dreamsicle Jelly!
- Step 1: Begin by preheating your oven to 350°F (175°C). While the oven heats, prepare your canning jars by sterilizing them according to your preferred method.
- Step 2: Strain your freshly squeezed orange juice through cheesecloth into a large, heavy-bottomed pot. This ensures a smooth, pulp-free jelly.
- Step 3: Add the granulated sugar, the scraped seeds and pods from the vanilla beans, and that small pat of butter to the pot. The vanilla beans will infuse the entire mixture with that signature creamy essence, making it smell amazing, much like a classic Dreamsicle Jello.
- Step 4 (With Pectin): If you’re using pectin, stir it into the orange juice mixture. Bring the pot to a rolling boil over high heat. Once it reaches a hard boil, continue boiling for exactly 1 minute, stirring constantly.
- Step 5 (Without Pectin): If you’re skipping pectin, bring the mixture to a hard boil over high heat. You’ll need to monitor the temperature closely. Continue boiling until it reaches 220°F (104°C) on a candy thermometer, and hold that temperature for 3 minutes. This concentration process is key to a firm set, much like a firm Dreamsicle Jello.
- Step 6: Carefully remove the pot from the heat. Fish out and discard the vanilla bean pods.
- Step 7: Ladle the hot jelly into your sterilized jars. Wipe the rims of the jars clean with a damp cloth to ensure a good seal. Place the lids on and screw on the bands until just fingertip tight.
- Step 8: Process the filled jars in a boiling-water canner for 10 minutes. Adjust processing time for altitude if necessary.
- Step 9: Once the processing time is up, carefully remove the jars from the canner and place them on a towel-lined counter in a draft-free spot to cool.
- Step 10: This is a fun step for an even vanilla distribution! Every 10 minutes while the jars are cooling, gently flip them upside down and then back upright. This helps distribute those lovely vanilla bean specks throughout your Dreamsicle Jello.
- Step 11: Let the jars cool completely, typically for 12-24 hours. Check the seals by pressing the center of each lid. If it doesn’t pop back, the seal is good. Refrigerate any jars that haven’t sealed properly.
Pro Tips for the Best Dreamsicle Jelly
You’re almost there! These little tricks will ensure your homemade Dreamsicle Jelly is absolutely perfect, capturing that nostalgic taste with ease. It’s all about the details!
- Always use fresh oranges for the best flavor and vibrant color. Bottled juice can sometimes lack the brightness needed for this orange cream jelly recipe.
- Don’t skip the butter! It seems odd, but that little pat really does help cut down on excessive foam, making the boiling process much cleaner.
- For a truly authentic taste, use real vanilla beans. The seeds provide those beautiful speckles and a richer, more complex flavor than extract alone.
- Ensure your jars are properly sterilized before filling. This is crucial for safe canning and a good seal.
What’s the secret to perfect Dreamsicle Jelly?
The magic really lies in capturing that creamy orange-vanilla essence. Using fresh oranges and real vanilla beans is key. The gentle flipping of the jars while cooling also helps distribute the vanilla specks evenly, enhancing the visual appeal and the overall Dreamsicle flavor jelly experience.
Can I make Dreamsicle Jelly ahead of time?
You absolutely can! You can prepare the orange juice and even measure out your sugar and vanilla a day or two in advance. Store the juice in the refrigerator. However, the actual cooking and canning process is best done when you have a dedicated block of time to ensure everything is done safely and correctly. For more canning tips, check out this guide on preserving food.
How do I avoid common mistakes with Dreamsicle Jelly?
The most common pitfalls are not reaching the correct boiling temperature or over-boiling. If you don’t reach 220°F (without pectin) or boil for the full minute (with pectin), your jelly might not set. Over-boiling can lead to a tough, sugary texture. Always use a reliable candy thermometer for best results.
Best Ways to Serve Dreamsicle Jelly
This delightful jelly is incredibly versatile, bringing a burst of sunshine to so many dishes. Its unique flavor makes it more than just a typical jam or spread; it’s a special treat!
One of my favorite ways to enjoy this Dreamsicle fruit spread is simply slathered on warm, buttery biscuits or toasted sourdough bread. The creamy orange-vanilla notes pair beautifully with the slightly tangy bread. It’s also fantastic swirled into plain Greek yogurt or cottage cheese for a quick, nostalgic breakfast or snack. For a more decadent dessert, try using it as a filling for thumbprint cookies or as a topping for vanilla ice cream. The possibilities are truly endless! You can find more delicious food ideas here.
Nutrition Facts for Dreamsicle Jelly
Here’s a breakdown of the estimated nutritional information per tablespoon for this delightful Dreamsicle Jelly. It’s always important to remember these are approximations, as the exact values can vary based on the ripeness of your oranges and the specific ingredients you use.
- Calories: ~50
- Fat: 0g
- Saturated Fat: 0g
- Protein: 0g
- Carbohydrates: ~13g
- Fiber: 0g
- Sugar: ~13g
- Sodium: ~0mg
Nutritional values are estimates and may vary based on specific ingredients used.

How to Store and Reheat Dreamsicle Jelly
Once your beautiful homemade Dreamsicle Jelly has cooled and set, proper storage is key to preserving its delightful flavor. After the jars have cooled completely and you’ve confirmed they’re sealed, store the sealed jars in a cool, dark pantry. They should remain fresh for up to a year. If any jars didn’t seal properly, or if you’re making a special batch with added cream for a richer Dreamsicle dessert jelly experience, be sure to refrigerate those immediately. These refrigerated batches will last about 3 to 4 days. For more information on safe canning practices, refer to resources like the National Center for Home Food Preservation.
For longer storage, you can freeze this jelly. Spoon it into freezer-safe containers, leaving about a half-inch headspace for expansion. Properly stored, it will keep its quality for up to 3 months. When you’re ready to enjoy your Dreamsicle Jelly again, simply thaw it overnight in the refrigerator. If the texture seems a bit separated after freezing, a gentle stir should bring it back together beautifully.
Frequently Asked Questions About Dreamsicle Jelly
What makes this Dreamsicle Jelly so special?
This Dreamsicle Jelly is special because it perfectly captures the nostalgic taste of the classic Dreamsicle treat. We use fresh oranges and real vanilla beans to achieve that creamy, citrusy flavor that brings back happy memories. It’s a delightful way to enjoy that unique Dreamsicle flavor jelly any time of year.
How do I make orange cream jelly if I don’t have fresh oranges?
If you can’t get fresh oranges, you can still achieve a wonderful flavor. For this Dreamsicle Jelly recipe, opt for 100% pure orange juice without any added pulp or preservatives. While fresh will always yield the brightest taste, a good quality bottled juice can work in a pinch. Just ensure it’s not from concentrate if possible, as that can sometimes alter the flavor profile. You can find more tips on choosing the best fruit juices here.
Can I use extract instead of vanilla beans for my Dreamsicle Jelly?
Yes, you absolutely can! While vanilla beans add beautiful speckles and a richer flavor, 2 teaspoons of pure vanilla extract can be substituted. Add the extract after you’ve removed the vanilla bean pods and just before ladling the jelly into jars. This ensures the delicate flavor isn’t boiled away. It’s still a fantastic way to make a delicious orange cream jelly recipe.
My Dreamsicle Jelly didn’t set firmly, what went wrong?
The most common reason for jelly not setting is not reaching the correct temperature or boiling time. Without pectin, the jelly needs to reach 220°F (104°C) and hold that temperature for 3 minutes to concentrate the sugars properly. If using pectin, ensure you boiled it for the instructed minute. Using a reliable candy thermometer is crucial for this Dreamsicle dessert jelly.
Variations of Dreamsicle Jelly You Can Try
This classic Dreamsicle Jelly recipe is wonderful on its own, but don’t be afraid to get creative! Here are a few variations to explore that add new dimensions to this beloved flavor profile. You can even adapt parts of this to a Dreamsicle jam recipe if you prefer a slightly looser texture.
- Creamy Dreamsicle Jelly: For an extra decadent and creamy twist, stir in about 1/4 cup of full-fat coconut milk or heavy cream into the jelly mixture just before ladling it into jars. Keep in mind that adding dairy or coconut milk will shorten the shelf life, so these batches should be refrigerated and consumed within a week.
- Spiced Dreamsicle Jelly: Warm up the flavor by adding a pinch of ground cinnamon or cardamom along with the vanilla bean seeds. This adds a subtle complexity that’s perfect for autumn or holiday baking.
- Sugar-Free Dreamsicle Jelly: If you’re watching sugar intake, you can experiment with sugar substitutes. Use a pectin specifically designed for low-sugar or sugar-free recipes and follow its package directions closely, as different sweeteners can affect the set.
- Dreamsicle Marmalade: For a bit more texture and a slightly more intense orange flavor, you can add finely grated orange zest along with the juice. This turns your jelly into a delightful marmalade.

Dreamsicle Jelly: Amazing 4sure Taste
- Total Time: Several hours (including cooling and setting)
- Yield: 6-8 half-pint jars 1x
- Diet: Vegetarian
Description
A bright, nostalgic jelly capturing the creamy orange-vanilla essence of a Dreamsicle. Perfect for spreading on toast, biscuits, or desserts.
Ingredients
- 4 cups freshly squeezed orange juice
- 4 cups granulated sugar
- 2 vanilla beans, split and scraped
- 1 pat of butter
- 1 box pectin (optional)
Instructions
- Strain freshly squeezed orange juice through cheesecloth into a large pot.
- Add sugar, vanilla bean pods and seeds, and butter.
- Bring the mixture to a hard boil over high heat.
- If using pectin: Stir in pectin. Keep stirring until it returns to a hard boil, then boil for exactly 1 minute.
- If not using pectin: Keep boiling until it reaches 220°F (104°C) and hold that boil for 3 minutes.
- Remove the pot from heat and take out the vanilla bean pods.
- Ladle the hot jelly into sterilized jars, wiping rims clean before sealing.
- Process jars in a boiling-water canner for 10 minutes.
- Place jars on a towel-lined counter in a draft-free spot.
- Every 10 minutes while cooling, gently flip jars upside down and back upright for even vanilla speck distribution.
- Once cooled, check seals. Refrigerate unsealed jars, store sealed jars in the pantry.
Notes
- This Dreamsicle Jelly recipe can be made with or without pectin.
- If making without pectin, boil until the mixture reaches 220°F and hold for 3 minutes.
- For a creamier twist, stir in a splash of coconut milk before filling jars. This will shorten shelf life, so refrigerate these batches.
- A spiced version can be made by adding a pinch of cinnamon or cardamom with the vanilla.
- Citrus jellies may take up to a day or two to fully set.
- If using bottled orange juice, ensure it is 100% juice with no additives.
- To check for a proper seal, press the center of the lid. If it doesn’t pop back, the seal is good.
- Prep Time: 20 minutes (plus time for squeezing oranges)
- Cook Time: 15-30 minutes
- Category: Preserves
- Method: Water Bath Canning
- Cuisine: American
Nutrition
- Serving Size: 1 tablespoon


